
Vue 3 还没有正式发布,但是 Alpha 版本已经发布了。
虽然官方还不推荐在生产环境中直接使用 Vue 3 ,但是提前学习总归是有好处的。
嘴上喊着老子学不动了,双手还是很诚实的打开了 Vue 3 文档
创建项目
Vue 官方很贴心的提供了一个 github 仓库,让我们能快速体验Vue 3的新特性:
1
2
| git clone https://github.com/vuejs/vue-next-webpack-preview.git vue3-start
cd vue3-start
|
1
| npm install or yarn intall
|
开发环境准备就绪后,启动命令:
在浏览器中打开 http://127.0.0.1:8080 ,您可以看到一个简单的计数器页面:
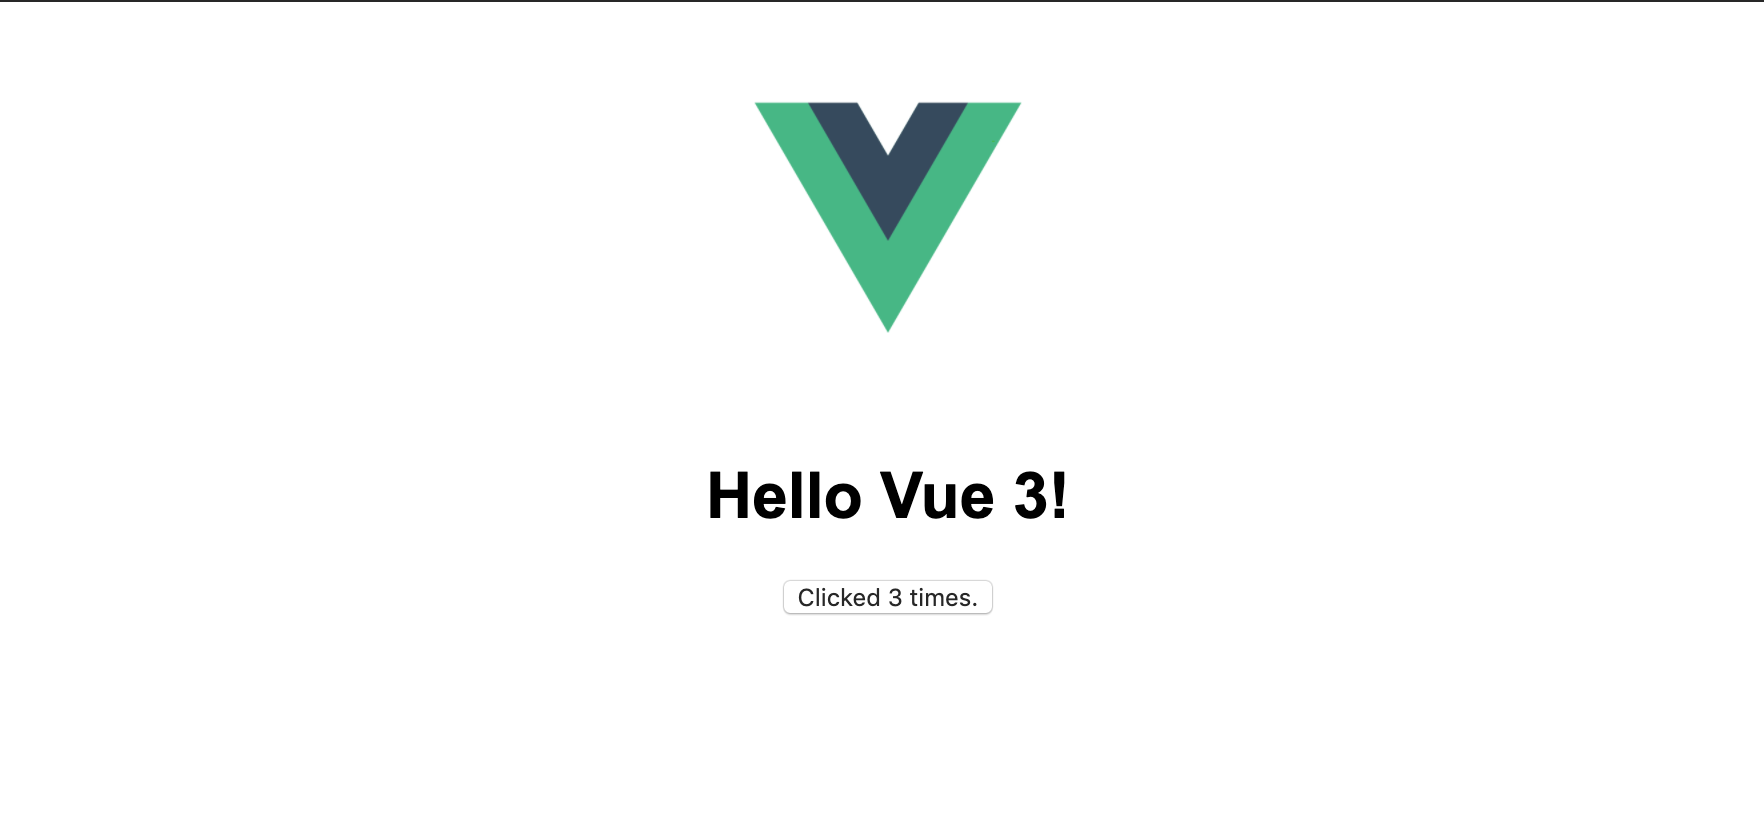
打开 package.json,当前使用的 vue 版本是:3.0.0-beta.2
Vue 3 新特性
Vue 3 的设计目标是更快,更小,并更好的支持 TypeScript 。
一些新特性包括:
1、Composition API
2、Multiple root elements
3、Suspense
4、Multiple V-models
5、Reactivity
6、Teleport
7、Transition
8、Remove Filter
9、App configuration
1、Composition API
Vue 官方发布了 Composition API 的官方插件,使广大用户可以在 Vue2.x 中享受 Function Base 带来的新体验。
而在 vue 3 中无需单独安装插件,开箱即用。
打开 App.vue,你会看到 setup()方法:
1
2
3
4
5
6
7
8
9
10
11
12
13
14
15
16
17
18
19
20
21
22
23
24
25
26
27
28
29
30
31
32
33
| <template>
<img src="./logo.png">
<h1>Hello Vue 3!</h1>
<button @click="inc">Clicked {{ count }} times.</button>
</template>
<script>
import { ref } from 'vue'
export default {
setup() {
const count = ref(0)
const inc = () => {
count.value++
}
return {
count,
inc
}
}
}
</script>
<style scoped>
img {
width: 200px;
}
h1 {
font-family: Arial, Helvetica, sans-serif;
}
</style>
|
Composition API 主要提供两大好处:
1、清晰的代码结构
2、消除重复逻辑
1
2
3
4
5
6
7
8
9
10
11
12
13
14
15
16
17
18
19
20
21
22
23
24
25
26
27
28
29
30
31
32
33
34
35
36
37
38
39
40
41
42
43
44
45
46
47
48
| <template>
<div class="counter">
<p>count: {{ count }}</p>
<p>NewVal (count + 2): {{ countDouble }}</p>
<button @click="inc">Increment</button>
<button @click="dec">Decrement</button>
<p> Message: {{ msg }} </p>
<button @click="changeMessage()">Change Message</button>
</div>
</template>
<script>
import { ref, computed, watch } from 'vue'
export default {
setup() {
let count = ref(0)
const countDouble = computed(() => count.value * 2)
watch(count, newVal => {
console.log('count changed', newVal)
})
const inc = () => {
count.value += 1
}
const dec = () => {
if (count.value !== 0) {
count.value -= 1
}
}
let msg= ref('some text')
watch(msg, newVal => {
console.log('msg changed', newVal)
})
const changeMessage = () => {
msg.value = "new Message"
}
return {
count,
inc,
dec,
countDouble,
msg,
changeMessage
}
}
}
</script>
|
如果你不喜欢使用 Composition API, 也可以继续使用 2.x 的传统方法:
1
2
3
4
5
6
7
8
9
10
11
12
13
14
15
16
17
18
19
20
21
22
23
24
25
26
27
28
29
30
31
32
33
34
35
36
37
38
39
40
41
42
43
44
45
46
47
| <template>
<div class="counter">
<p>count: {{ count }}</p>
<p>NewVal (count + 2): {{ countDouble }}</p>
<button @click="inc">Increment</button>
<button @click="dec">Decrement</button>
<p> Message: {{ msg }} </p>
<button @click="changeMessage()">Change Message</button>
</div>
</template>
<script>
export default {
data() {
return {
count: 0,
msg: 'some message'
}
},
computed: {
countDouble() {
return this.count*2
}
},
watch: {
count(newVal) {
console.log('count changed', newVal)
},
msg(newVal) {
console.log('msg changed', newVal)
}
},
methods: {
inc() {
this.count += 1
},
dec() {
if (this.count !== 0) {
this.count -= 1
}
},
changeMessage() {
msg = "new Message"
}
}
}
</script>
|
上面两段代码在效果上市完全等价的
使用 Composition API 的好处:可以让我们更好地组织代码(state, methods, computed properties, watcher 等)。
随着组件规模的增长,如何组织我们的业务代码逐渐变成一个重要的问题,确保新进的开发人员都可以轻松地理解代码,而不需要花太多时间。
以前我们会使用 mixin 来复用代码。然而,mixin 最大的痛点是,需要我们跟踪不同组件中的状态和方法,这往往会给开发带来一定的心智负担,一不小心,mixin 可能会覆盖组件中的现有状态或方法。
使用 Composition API 让代码复用更加容易。
我们同样可以抽取出重复功能的代码:
1
2
3
4
5
6
7
8
9
10
11
12
|
import { ref, watch } from "vue";
export function message() {
let msg = ref(123);
watch(msg, (newVal) => {
console.log("msg changed", newVal);
});
const changeMessage = () => {
msg.value = "new Message";
};
return { msg, changeMessage };
}
|
在其他组件中使用上面组件:
1
2
3
4
5
6
7
8
9
10
11
12
13
14
15
16
17
18
19
20
21
22
23
24
25
26
27
28
29
30
31
32
33
34
35
36
37
38
39
40
| <template>
<div class="counter">
<p>count: {{ count }}</p>
<p>NewVal (count + 2): {{ countDouble }}</p>
<button @click="inc">Increment</button>
<button @click="dec">Decrement</button>
<p>Message: {{ msg }}</p>
<button @click="changeMessage()">change message</button>
</div>
</template>
<script>
import { ref, computed, watch } from 'vue'
import { message } from './common/message'
export default {
setup() {
let count = ref(0)
const countDouble = computed(() => count.value * 2)
watch(count, newVal => {
console.log('count changed', newVal)
})
const inc = () => {
count.value += 1
}
const dec = () => {
if (count.value !== 0) {
count.value -= 1
}
}
let { msg, changeMessage } = message()
return {
count,
msg,
changeMessage,
inc,
dec,
countDouble
}
}
}
</script>
|
2、Multiple root elements
在 Vue 2 中,tempalte 只能取一个根元素。即使我们只有两个 <p> 标记,我们也必须将它们包含在一个 <div> 标记中:
1
2
3
4
5
6
7
| <template>
<div class="counter">
<p> Count: {{ count }} </p>
<button @click="increment"> Increment </button>
<button @click="decrement"> Decrement</button>
</div>
</template>
|
为了能编译通过,我们通常会增加一个根节点。
这个设计确实很糟糕,我曾经无数次吐槽过这个设计。因为会带来不必要的代码嵌套和缩进。
幸好在 Vue 3 中取消了这一限制:
可以直接在<template></template>中使用任意数量的标签:
1
2
3
4
5
| <template>
<p> Count: {{ count }} </p>
<button @click="increment"> Increment </button>
<button @click="decrement"> Decrement </button>
</template>
|
用 VScode 打开模板时,看到一些 lint 错误,这是因为官方插件 eslint-plugin-vue 还没有支持新的模板语法。
3、Suspense
Suspense 是一个 Vue 3 新特性。
通常前后端交互是一个异步的过程: 默认我们提供一个加载中的动画,当数据返回时配合使用 v-if 来控制数据显示。
Suspense 的出现大大简化了这个过程:它提供了 default 和 fallback 两种状态:
1
2
3
4
5
6
7
8
9
10
11
12
13
14
15
16
17
18
19
20
21
22
23
24
25
26
27
28
29
30
31
| <template>
<Suspense>
<template #default>
<div v-for="item in articleList" :key="item.id">
<article>
<h2>{{ item.title }}</h2>
<p>{{ item.body }}</p>
</article>
</div>
</template>
<template #fallback>
Articles loading...
</template>
</Suspense>
</template>
<script>
import axios from 'axios'
export default {
async setup() {
let articleList = await axios
.get('https://jsonplaceholder.typicode.com/posts')
.then(response => {
console.log(response)
return response.data
})
return {
articleList
}
}
}
</script>
|
4、Multiple v-models
我们都知道 v-models 用于双向数据绑定。一般用于与表单元素一起使用。有时我们会在自定义组件中使用它。
Vue 2 只允许在一个组件上使用一个 v-models。在 Vue 3 中,我们可以将任意数量的 v-model 绑定到我们的定制组件上:
1
2
3
4
5
| <template>
<survey-form v-model:name="name" v-model:age="age">
{" "}
</survey-form>
</template>
|
SurveyForm.vue:
1
2
3
4
5
6
7
8
9
10
11
12
13
14
15
16
17
18
19
20
21
22
23
24
25
| <template>
<div>
<label>Name: </label>
<input :value="name" @input="updateName($event.target.value)" />
<label>Age: </label>
<input :value="age" @input="updateAge($event.target.value)" />
</div>
</template>
<script>
export default {
props: {
name: String,
age: Number
},
setup(props, { emit }) {
const updateName = value => {
emit('update:name', value)
}
const updateAge = value => {
emit('update:age', +value)
}
return { updateName, updateAge }
}
}
</script>
|
5、Reactivity
Vue 2 的响应式已经非常棒了,但在少数情况下会存在一些问题:
1
2
3
4
5
6
7
8
9
10
11
12
13
14
15
16
17
18
19
20
21
22
23
24
25
26
27
28
29
| <template>
<div class="hello" @click="test">test {{list }} {{ myObj }}</div>
</template>
<script>
export default {
name: "HelloWorld",
data() {
return {
list: [1, 2],
myObj: { name: "Preetish" }
};
},
watch: {
list: {
handler: () => {
console.log("watcher triggered");
},
deep: true
}
},
methods: {
test() {
this.list[2] = 4;
this.myObj.last = "HS";
delete this.myObj.name;
}
}
};
</script>
|
我们发现通过this.list下标来修改元素,并不会触发 wacher 监听函数,为了达到目的,我们不得不使用 vue.set() 或 vue.delete() 这些方法。
而在 vue 3 中,我们不需要借助其他 API:
1
2
3
4
5
6
7
8
9
10
11
12
| export default {
setup() {
let list = ref([1, 2]);
let myObj = ref({ name: "Preetish" });
function myFun() {
list.value[3] = 3;
myObj.value.last = "HS";
delete myObj.value.name;
}
return { myFun, list, myObj };
},
};
|
6、Portals
Portals 提供了一种将组件中渲染到页面任意一个 DOM 节点中的能力。在 Vue 2 中,利用一个 portal-vue 的第三方插件来做到这一点。
在 vue 3 中直接使用:
1
2
3
| <Teleport to="#modal-layer">
<div class="modal">hello</div>
</Teleport>
|
<Teleport> 是 vue3 中提供特定的标签用于创建一个 Portals。
<Teleport> </Teleport>中间出现的内容会出现在 to 指定的节点中:
1
| <div id="modal-target"></div>
|
目前为止,<Teleport>在 Alpha 版本中并不能使用
7、Transition
之前我在使用 v-enter-active, v-enter, v-enter-to 这些个状态时搞的晕头转向。
现在 Vue 3 从命名上更直观了: v-enter 变成了 v-enter-from,v-leave 变成 v-leave-from。
8、Remove Filter
Vue 3 抛弃了 Filter 的用法,更推荐使用计算属性或方法来实现:
1
2
3
4
5
| <!-- vue 2.x -->
{{ date | format }}
<!-- vue 3.0 -->
{{ format(date) }}
|
9、App configration
在 Vue 2 中,如果想使用 use(), mixin() , directive() 等方法需要配合全局 Vue 对象:
1
2
3
4
5
6
7
8
9
10
11
12
13
14
15
| import Vue from "vue";
import App from "./App";
Vue.use();
Vue.mixin();
Vue.component();
Vue.directive();
new Vue({
el: "#app",
template: "<App/>",
components: {
App,
},
});
|
在 Vue 3 中, 改成了 createApp 返回的 Vue 实例:
1
2
3
4
5
6
7
8
9
10
11
| import { createApp } from "vue";
import App from "./App.vue";
const app = createApp(App);
app.use();
app.mixin();
app.component();
app.directive();
app.mount("#app");
|
结束语
总之Vue 3 通过提供一种简单的方式来组织和共享代码,并提供强大的 TypeScript 支持,新的代码组织方式会对未来的应用开发产生重大影响。
同时一些其它的特性,如 Suspense,多个 v-models 等也会给开发带来巨大的便利。
同时性能更快,体积更小。它是如何做到的请参考我写的另一篇文章:Vue.js 作者:关于 Vue3.0 背后的故事