webpack优化指南
/ / 点击 / 阅读耗时 13 分钟一、production vs development
从 webpack 4 起提供了 production 和 development 两种模式。
除此之外,production 默认开启了以下配置:
- 1、tree shaking
- 2、performance hints
- 3、minification - TerserWebpackPlugin
以上等等。
绝大多数场景,使用 production 就能很好地满足大部分业务需求了。如果需要做特定优化,就需要通过调整默认值配置。
这篇文章介绍到的一些配置,以及背后的原理。
1-1 webpack-bundle-analyzer
webpack-bundle-analyzer 将整个构建过程和结果进行数据、图形上的分析,来帮助开发者做优化决策。
在 package.json 中加入两个 npm 脚本,分别在不同环境构建并打开 bundle analyzer:
1 | // package.json |
当执行 npm run build:analyze, 浏览器会自动打开 http://localhost:8888
1 | // webpack.prod.js |
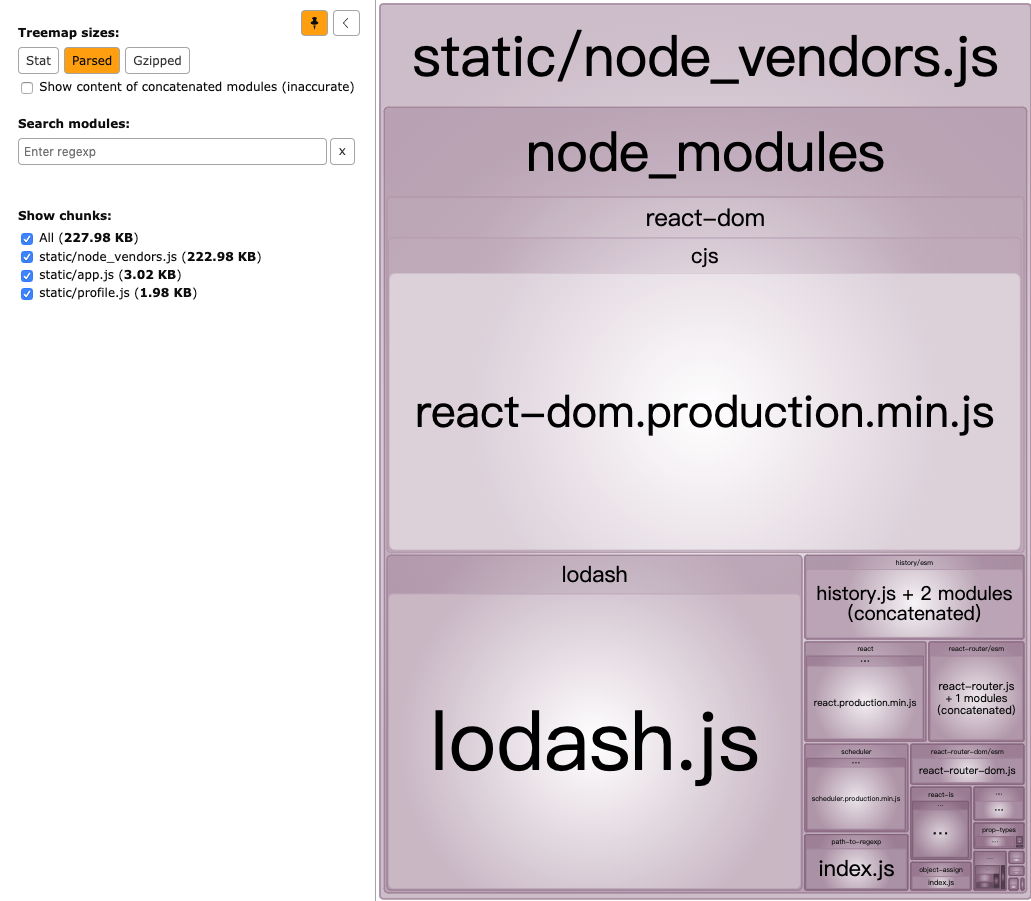
很多像开发阶段的 warning info 语句都被去掉了,react-dom.production.min.js 看起来体积会小很多,
如果仔细看,还是能看出一些不属于生产环境的模块:
react-hot-loader 是否应该出现在生产环境?
needs improvement to exclude react-hot-loader
二、code splitting
2-1 目的
让浏览器下载更少的代码,让页面更快的渲染出来。
2-2 多入口
1 | // webpack.prod.js |
利用 HtmlWebpackPlugin 来生成 html:
1 | // webpack.prod.js |
代码分支:entry-point-splitting-multiple-html
————————————————————————————————————————————————————————————————————————————————————————————————
注意有个小坑
如果不指定 chunks 的话,HtmlWebpackPlugin 会将所有的 chunk 都生成到 html 中:
1 | <!-- dist/index.html --> |
记得一定要指定 chunk 属性
2-3 vendor split
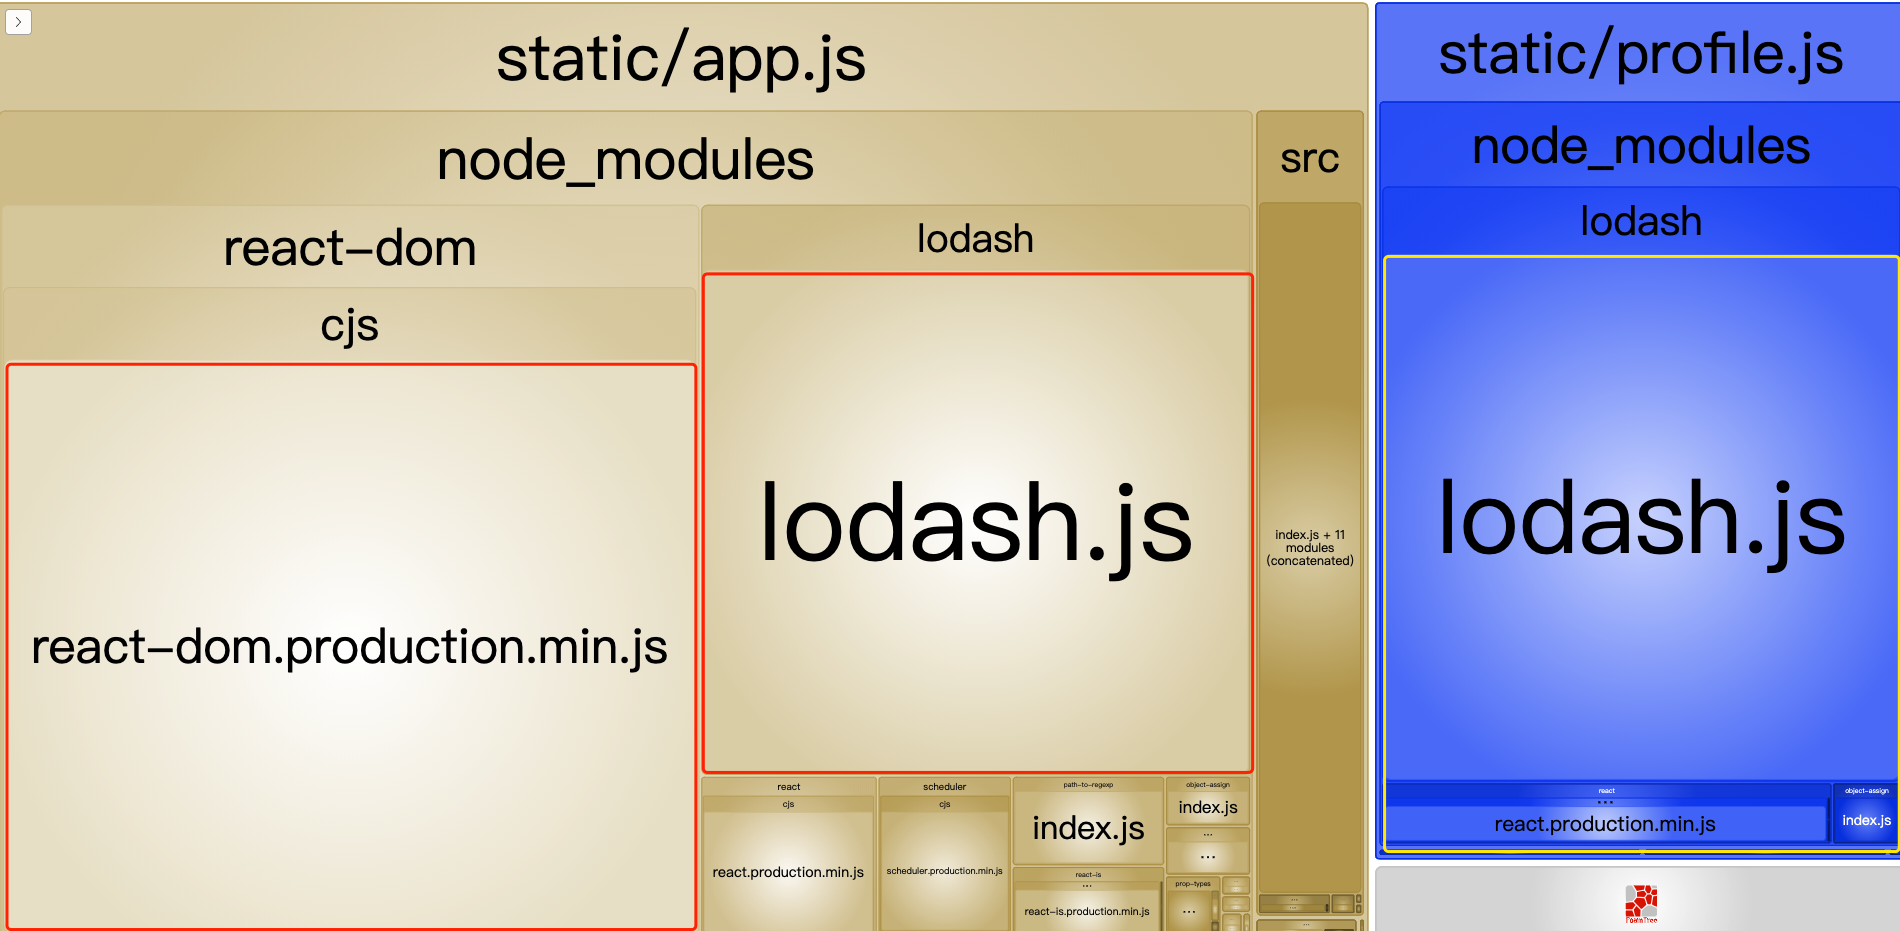
react.production.min.js 和 lodash.js 一个属于 react 框架,一个广泛使用的工具库,在 app.js 和 profile.js 中重复打包了,更好的做法应该是将重复的代码单独抽成一个独立的 bundle 文件
这样做的好处:
- 1、减少了业务文件
app和profile的体积 - 2、利用缓存来提升页面加载速度
通常来说,业务代码的修改频率要远高于第三方代码的更新频率,所以将两者分开打包,能发挥静态资源缓存的最大威力。
webpack3 使用 CommonsChunkPlugin 进行 chunks 切分,可是它存在许多的问题:
- 会下载一些我们所不需要的代码
- 在异步 chunks 下是低效率的
- 会比较难使用
- 实践起来比较难以理解
webpack4 做出了一个重大改进, 使用 SplitChunksPlugin 取代 CommonsChunkPlugin
代码分支: vendor-splitting
增加了 optimization.splitChunks 配置项:
1 | // webpack.prod.js |
1 | npm run build |
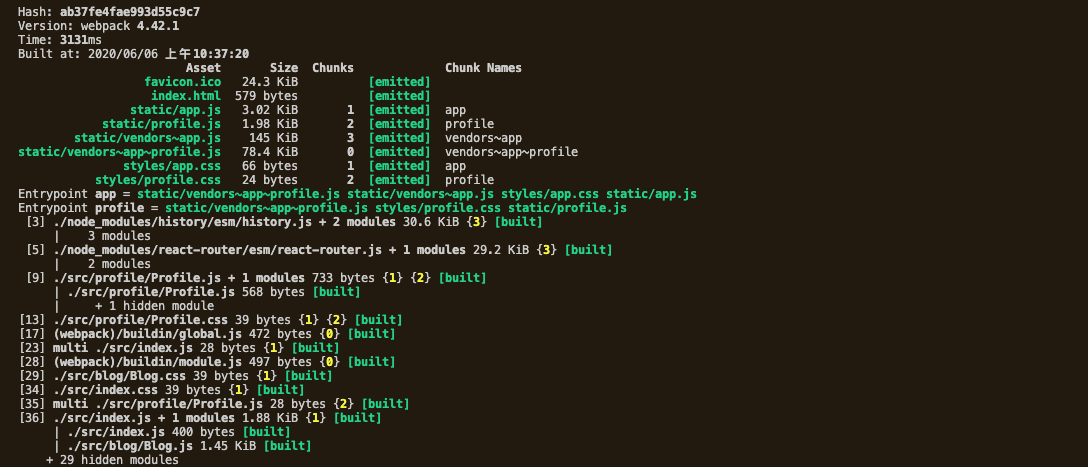
app.js 和 profile.js 如我们预期的那样变小了,同时新增了两个 bundle 文件:
vendors~app.jsvendors~app~profile.js
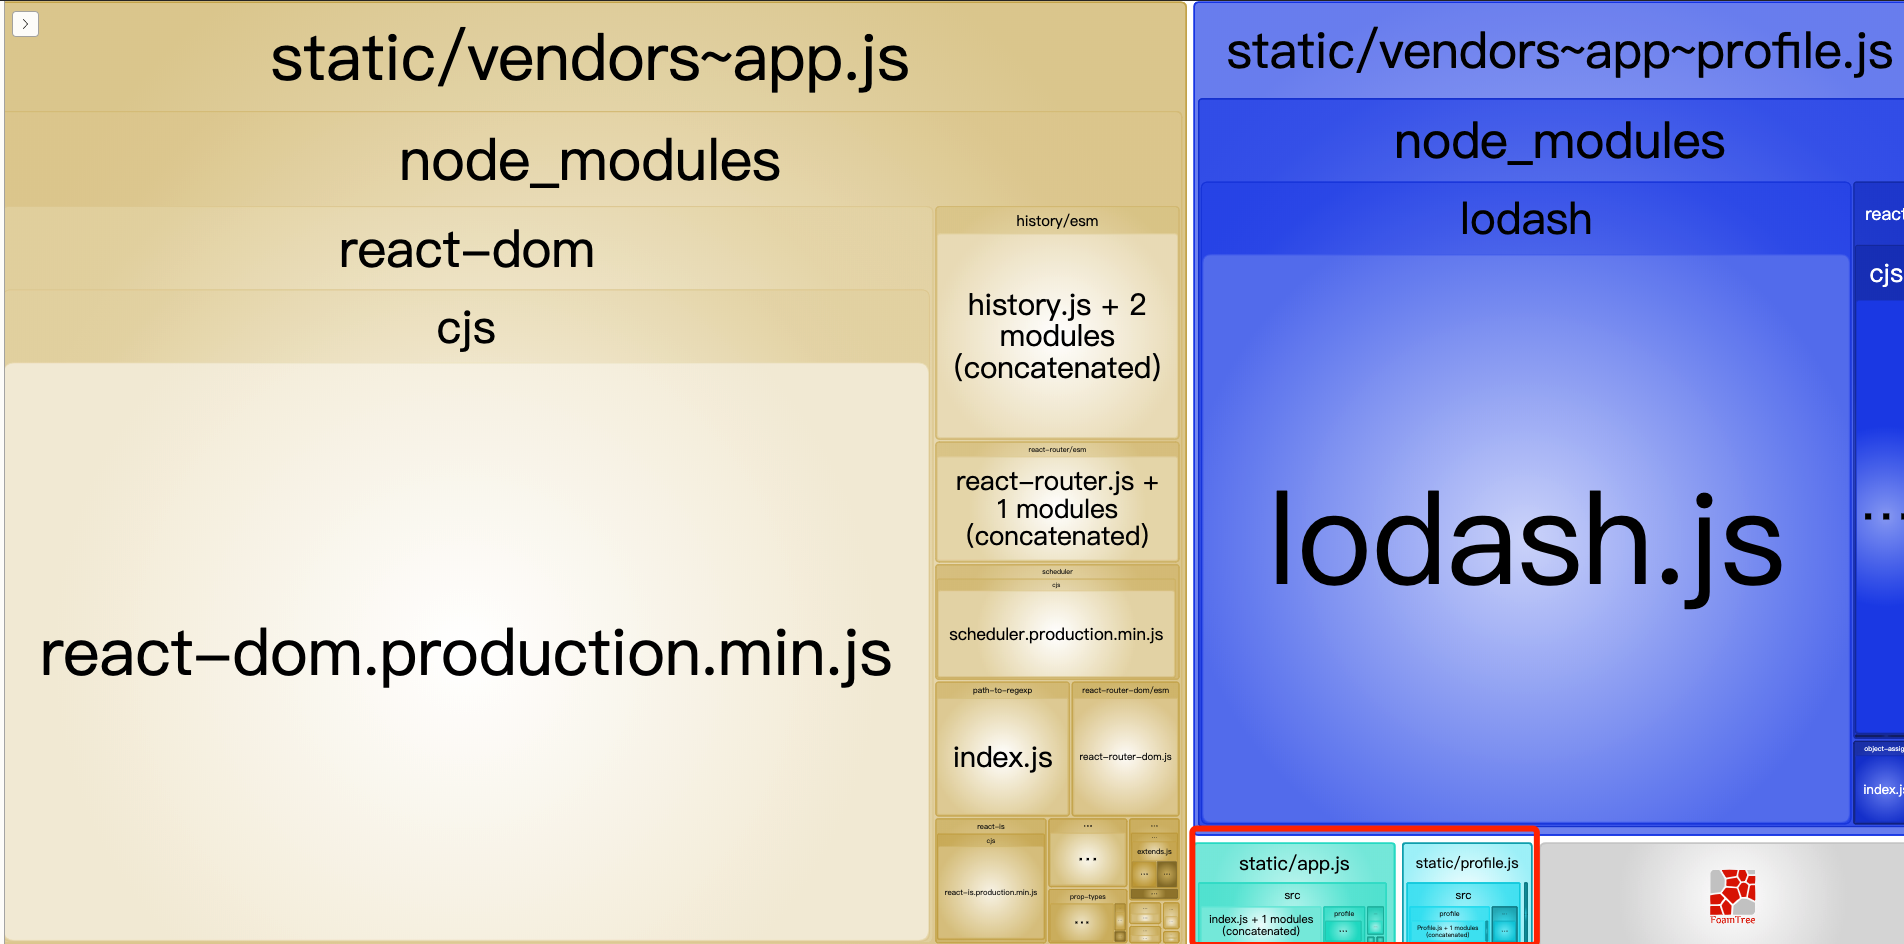
依赖关系示意图:
- app.js: react, react-dom, other codes
- profile.js: lodash, other codes
webpack 4: Code Splitting 和 chunks 切分优化
SplitChunksPlugin工作原理:
- 1、自动识别应该被分块的模块,利用模块重复计数和模块类别(如 node_modules),来分割 chunks
- 2、默认情况下只有 ≥30 kb 包会参与分割
- 3、有时 webpack 故意重复代码
试一下将 splitChunks 的 minSize 设置为 600kb
代码分支
vendor-splitting-tweaking
1 | // webpack.prod.js |
2-4 splitChunks 更多配置
1 | // webpack.prod.js |
分支代码: vendor-splitting-cache-groups
大多数情况下 chunks 设置为 all 就可以了,除非你想精确到 lazy 或 async-load 级别的分割,可以使用 async。
2-5 common split
与分离第三方库类似,不同之处在于分离的对象是我们公共的业务代码。
1 | // webpack.prod.js |
代码分支:common-splitting
2-6 Router Lazy loading
1 | // package.json |
开启 es6 import 语法:
1 | // .babelrc |
1 | // ProfileLazy.js |
webpackChunkName 用于指定 chunkname
代码分支:code-splitting-routes
2-7 Component Lazy loading
代码分支:code-splitting-component-level
三、webpack manifest
代码分支:manifest-splitting
四、external
在 manifest-splitting 分支做如下修改:
1 | // webpack.prod.js |
1 | <!-- public/index.html --> |
五、tree shaking
5-1 为什么需要 tree shaking
在 webpack 4 production 模式下 tree shaking 会自动工作,你必须使用 ES6 模块语法。除非你是在使用 CommonJS 模块系统的遗留项目上工作
一定要确保 es6 语法不被转换成 es5 语法:
1 | // .babelrc |
1 | // webpack.prod.js |
5-2 第三方库-lodash 的 tree shaking
代码分支:lodash-modular
当使用第三方库的时候,一定要检查一下是否提供了模块化版本,否则寻找模块化的替代方案或自己实现。
webpack v4 开始新增了一个 sideEffects 特性,通过给 package.json 加入 sideEffects: false 声明该包模块是否包含 sideEffects(副作用),从而可以为 tree-shaking 提供更大的优化空间。
六、performance budget
代码包过大会影响用户体验,webpack 很贴心的提供了监控代码体积的功能:budget。
在
production模式中,代码体积超出阈值默认会警告。
如何配置:performance-budgets
代码分支:performance-budget
1 | // webpack.prod.js |
建议配置 hints: “error”。 这样会让你更加专注于代码体积和用户体验。
七、source maps
source-map vs inline-source-map
代码分支:sourcemaps
八、long-term caching
1 | // webpack.prod.js |
有三种文件名占位符:
- [hash]: 改变一个 chunk 文件,整个应用的 hash 都会改变 -> caching-hash
- [chunkhash]: 每一个 chunk 文件对应一个 chunhash -> caching-chunkhash
- [contenthash]: 基于资源内容计算出的 contenthash -> caching-contenthash
- 抽离 manifest
- 使用 moduleIds
代码分支:caching-moduleids
1 | // webpack.prod.js |